Funky nails bring a burst of creativity and fun to your fingertips. Vibrant colors, bold patterns, and playful designs come together to create a look that’s uniquely you.
Think neon stripes, polka dots, and quirky shapes that catch the eye and add a touch of whimsy to your style. Perfect for any occasion, these funky nail designs are a great way to showcase your personality and stand out from the crowd.
Ready to add some flair to your nails? Get inspired and start experimenting with these lively and dynamic designs!
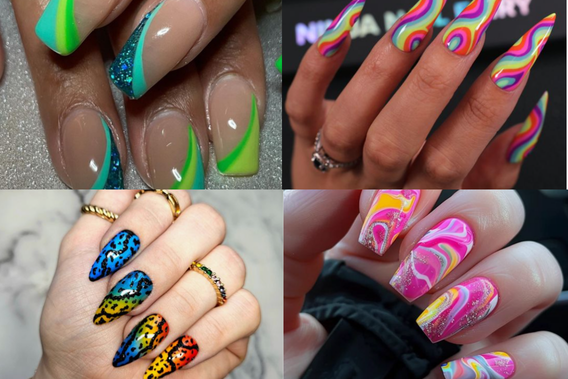
1. Funky French Tips
Kick your classic French tips up a notch with bold colors and playful patterns. Instead of traditional white tips, go for vibrant shades like neon pink, electric blue, or sunny yellow. Add fun designs like polka dots or stripes to make them even more unique. To create this look, start with a base coat, paint your chosen color on the tips, and finish with a top coat to seal the design.
2. Rainbow Swirls
Add a touch of whimsy with swirling rainbow patterns. This design features bright, intertwined colors creating a mesmerizing effect. To achieve this, use a fine brush to paint wavy lines in various rainbow hues over a white or clear base. Seal with a top coat to protect your vibrant artwork.
3. Animal Print Nails
Show off your wild side with animal print nails. Think leopard spots, zebra stripes, or tiger stripes. Use a base color and apply the animal print pattern with a detail brush in black or contrasting color. Finish with a glossy top coat to add shine and longevity.
4. Tie-Dye Nails
Channel some retro vibes with tie-dye nails. This colorful, psychedelic pattern is perfect for summer. Start with a white base, then apply different colors in a circular pattern using a small brush. Blend the colors with a toothpick to create the tie-dye effect. Seal with a top coat for a smooth finish.
5. Neon Geometric Designs
Neon geometric designs are perfect for those who love bold and bright. Use neon colors and create shapes like triangles, squares, and lines on a neutral base. A striping brush will help you get those clean lines. Finish with a top coat to make your nails pop.
6. Pop Art Nails
Bring a piece of art to your fingertips with pop art nails. Inspired by comic books, these designs feature bright colors, bold outlines, and dot patterns. Use a white base, then add colorful shapes and outlines using a fine brush and black nail polish. A glossy top coat will complete the look.
7. Abstract Art Nails
Express your inner artist with abstract art nails. This design lets you play with colors, shapes, and patterns freely. Apply a base color, then use different brushes and dotting tools to create abstract patterns. Finish with a top coat to protect your masterpiece.
8. Glitter Explosion
For those who love all things sparkly, a glitter explosion is the way to go. Start with a base color, then layer on glitter polish or loose glitter in various sizes and colors. A clear top coat will keep the glitter in place and add extra shine.
9. Color Block Nails
Add a modern twist to your nails with color block designs. Choose two or more colors and paint your nails in distinct blocks. Use nail tape to get clean lines between colors. After the polish dries, remove the tape and apply a top coat to finish the look.
10. Psychedelic Patterns
Psychedelic patterns are perfect for those who love a bit of chaos in their designs. These nails feature swirls, waves, and bright colors reminiscent of the 60s and 70s. Use a variety of colors and a fine brush to create intricate patterns, then seal with a top coat.
11. Funky Fruit Designs
Bring some fun to your nails with funky fruit designs. Paint tiny fruits like watermelons, pineapples, or strawberries on a pastel or white base. Use a fine brush and bright colors to detail the fruits, and finish with a glossy top coat to add shine.
12. Polka Dot Party
Polka dots never go out of style. Create a playful polka dot design using different sizes and colors of dots over a neutral or contrasting base. Use a dotting tool for precise dots and finish with a top coat to seal the design.
13. Neon Stripes
Neon stripes are perfect for a bold statement. Use bright neon colors and a striping brush to create vertical, horizontal, or diagonal stripes on your nails. A clear top coat will keep your stripes looking sharp and vibrant.
14. Retro 70s Nails
Bring back the groovy vibes with retro 70s nails. Think earthy tones, bold patterns, and flower power designs. Use a mix of oranges, browns, and yellows to create floral and geometric patterns. A glossy top coat will give your nails a polished finish.
15. Comic Book Nails
Comic book nails are a fun and quirky way to showcase your love for pop culture. Use bright colors and black outlines to create comic-style designs, including speech bubbles and action words. A top coat will protect your detailed artwork.
16. Graffiti Art Nails
Channel your inner street artist with graffiti art nails. Use bright colors and bold patterns to mimic the look of graffiti. A fine brush and a mix of colors will help you create intricate designs. Seal with a top coat to keep your artwork intact.
17. Holographic Nails
Holographic nails are perfect for adding a futuristic touch. Use holographic nail polish or powder over a base color to create a stunning, multi-dimensional effect. A clear top coat will enhance the holographic shine.
18. Funky Floral Designs
Add a touch of nature with funky floral designs. Use bright colors and a fine brush to paint flowers of different shapes and sizes on a neutral or contrasting base. A glossy top coat will make your floral nails stand out.
19. 3D Nail Art
For those who love texture, 3D nail art is a must-try. Use acrylics or nail charms to create three-dimensional designs like flowers, bows, or gems. A strong top coat will help secure the 3D elements to your nails.
20. Colorful Confetti Nails
Colorful confetti nails are all about fun and celebration. Apply a clear or pastel base, then add multicolored confetti or glitter pieces. Use a clear top coat to seal the confetti and add an extra layer of shine.
Related posts:
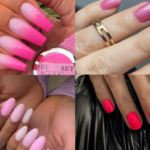 20 Stunning Pink Nail Designs to Elevate Your Manicure Game
 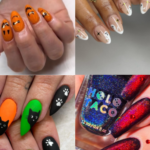 20 Spooktacular Halloween Nail Designs You Must Try This Season
 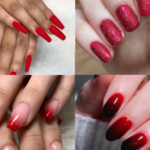 20 Gorgeous Red Nail Designs That Will Make You Stand Out
 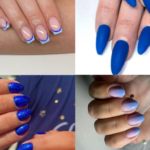 20 Eye-Catching Blue Nail Designs to Inspire Your Next Manicure
  20 Must-Try Gel Nail Designs for a Perfect Manicure
  20 Classy Nail Designs to Elevate Your Style
  20 Eye-Catching Ombre Nail Designs to Transform Your Look
  20 Must-Try Summer Nail Colors to Brighten Up Your Season